
This series refer to an older version of LWJGL 3. The updates are in progress.
Contents
Welcome to the fifth part of the LWJGL Tutorial Series. In the previous tutorial, we have got some theory on the GLSL language, and we learnt some of the syntax. In this tutorial, we are going to draw our first triangle onto the screen. But before we do that, we should load the shaders and compile them, that is what we are going to look for now. So lets get started with the Shader class.
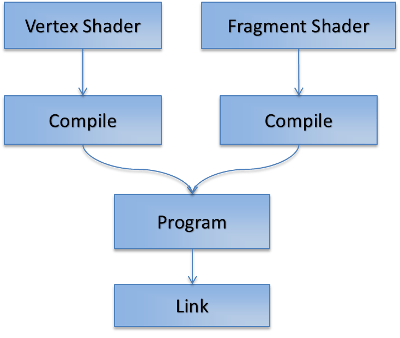
This image says all about how you are going to create a program. We load the Vertex and Fragment shaders separately and then we compile them. We then attach the compiled shaders to the program, and we link it. That makes our program ready to be used. If you looked the above image, you could identify that the Geometry Shader is missing. That is because using a Geometry shader is completely optional and is not necessary.
The ShaderProgram class
So let us start with the basic class design to encapsulate shaders and programs. Though we should treat Shaders and Programs different, I’m going to combine them into one single class so that I can keep things simple. Let us start with the first step, loading the shader code.
public static String readFromFile(String name)
{
    StringBuilder source = new StringBuilder();
    try
    {
        BufferedReader reader = new BufferedReader(
                                    new InputStreamReader(
                                        ShaderProgram.class
                                                     .getClassLoader()
                                                     .getResourceAsStream(name)));

        String line;
        while ((line = reader.readLine()) != null)
        {
            source.append(line).append("\n");
        }

        reader.close();
    }
    catch (Exception e)
    {
        System.err.println("Error loading source code: " + name);
        e.printStackTrace();
    }

    return source.toString();
}
The above method goes into the FileUtil class and is used to load a file into a single large string. Now that we get the utility method, we now concentrate on loading the source into OpenGL and compiling it. First we need imports for the OpenGL functions we use.
import static org.lwjgl.opengl.GL11.*;
import static org.lwjgl.opengl.GL20.*;
We are importing the functions that belongs to OpenGL 1.1 and OpenGL 2.0 into our program. We need these imports because shaders are introduced into OpenGL at version 2.0. Now first, we have to create an OpenGL program object.
programID = glCreateProgram();
The above function goes into the constructor. What it does is very simple, it creates a Program object and returns a handle which we use to manipulate that program. The next step, is to load the shaders. As usual, we create a Shader object, upload the source code to it, compile it, check for errors, and attach them to the program. This small code snippet shows the attachVertexShader method of the class.
public void attachVertexShader(String name)
{
    // Load the source
    String vertexShaderSource = FileUtil.readFromFile(name);

    // Create the shader and set the source
    vertexShaderID = glCreateShader(GL_VERTEX_SHADER);
    glShaderSource(vertexShaderID, vertexShaderSource);

    // Compile the shader
    glCompileShader(vertexShaderID);

    // Check for errors
    if (glGetShaderi(vertexShaderID, GL_COMPILE_STATUS) == GL_FALSE)
        throw new RuntimeException("Error creating vertex shader\n"
                                   + glGetShaderInfoLog(vertexShaderID, glGetShaderi(vertexShaderID, GL_INFO_LOG_LENGTH)));

    // Attach the shader
    glAttachShader(programID, vertexShaderID);
}
This loads the code from the filename we provided as a string and creates the vertex shader using that code. We first create the shader object, source it with the code, compile it and check for errors. Then we attach the shader to the program we created before. The code to attach the fragment shader goes into the attachFragmentShader method. I’m not going to show that, because all you do is to replace GL_VERTEX_SHADER constant with the GL_FRAGMENT_SHADER constant and change the ID to fragmentShaderID, that is all there is to it. The last thing we need to do is to link the program. Here is how to do that.
public void link()
{
    // Link this program
    glLinkProgram(programID);

    // Check for linking errors
    if (glGetProgrami(programID, GL_LINK_STATUS) == GL_FALSE)
        throw new RuntimeException("Unable to link shader program:");
}
Now that we have loaded the shaders and the program, we need to tell OpenGL to use the program we have created to do the rendering. We do that by calling glUseProgram(programID) and it tells OpenGL to use our program. We still have to do one thing, we need to dispose the shaders and the program when we no longer need them.
public void dispose()
{
    // Unbind the program
    unbind();

    // Detach the shaders
    glDetachShader(programID, vertexShaderID);
    glDetachShader(programID, fragmentShaderID);

    // Delete the shaders
    glDeleteShader(vertexShaderID);
    glDeleteShader(fragmentShaderID);

    // Delete the program
    glDeleteProgram(programID);
}
That is all there is to the shaders and programs. We are placing this ShaderProgram class in the util package so that we can use it in our future tutorials. Now for the next part, rendering the triangle.
Simple Pass-Away Shaders
Before going further, we need to say what happens to the vertices we pass in. For this first tutorial, our shaders will be very simple, we just write them such that they just pass the inputs. Let’s start with the vertex shader.
#version 330 core

layout(location = 0) in vec2 position;

void main()
{
    gl_Position = vec4(position, 0.0, 1.0);
}
The above shader is pretty much simple, it just accepts a 2D vector called as position and it just outputs a 4D vector made from the input position. Now let’s write the fragment shader.
#version 330 core

out vec4 fragColor;

void main()
{
    fragColor = vec4(1.0);
}
The fragment shader is even more simple, all it does is it declares the output as a 4D vector and in the main function, it just outputs the white color. We make use of the swizzling vec4 constructor to simplify the call.
Specifying the Vertices
We are now ready to specify the vertices, but before that, we need to learn a bit about Buffer Objects and Vertex Arrays in OpenGL. To make it simple, you can consider that buffer objects are storage on the GPU, and vertex arrays remember the state of the vertices you specify. Here, I will show you the code first, and explain it later.
// Generate and bind a Vertex Array
vaoID = glGenVertexArrays();
glBindVertexArray(vaoID);

// The vertices of our Triangle
float[] vertices = new float[]
{
    +0.0f, +0.8f,    // Top coordinate
    -0.8f, -0.8f,    // Bottom-left coordinate
    +0.8f, -0.8f     // Bottom-right coordinate
};

// Create a FloatBuffer of vertices
FloatBuffer verticesBuffer = BufferUtils.createFloatBuffer(vertices.length);
verticesBuffer.put(vertices).flip();

// Create a Buffer Object and upload the vertices buffer
vboID = glGenBuffers();
glBindBuffer(GL_ARRAY_BUFFER, vboID);
glBufferData(GL_ARRAY_BUFFER, verticesBuffer, GL_STATIC_DRAW);

// Point the buffer at location 0, the location we set
// inside the vertex shader. You can use any location
// but the locations should match
glVertexAttribPointer(0, 2, GL_FLOAT, false, 0, 0);
glBindVertexArray(0);
Now coming to the explanation, we have five parts in the above code. First we create and bind a vertex array. This is what remembers the pointers we give to OpenGL. Using these Vertex Arrays allow you to write code that doesn’t mess with others pointers. Then comes the vertices. In this tutorial, we are going to render a 2D triangle, we have two components per vertex, the x and y coordinates.
Then we are creating a FloatBuffer which wraps the vertices array and flip it. These FloatBuffers store the values in the float array in native arrays, allowing OpenGL to read them, which otherwise couldn’t happen. Then we are creating the Buffer Object using two functions namely glBindBuffer and glBufferData. The first function makes the buffer object active and second one pushes the data into it. In this phase, we are storing our data inside the GPU.
Now comes the most important function which needs some explanation, it is the glVertexAttribPointer function. Here is the documentation of that function.
| Parameter | Description |
|---|---|
index |
This is the location where the input from the buffer object goes |
size |
Specifies the number of components per vertex. Should be 1-4 |
type |
Specifies the data type of the components. |
normalized |
Whether the specified values should be normalized |
stride |
Specifies the byte offset between components in a tuple |
offset |
Specifies the offset of the first component |
So with the call to glVertexAttribPointer(0, 2, GL_FLOAT, false, 0, 0) we are saying that we need to set the index location in the shader is 0, we have two components per vertex, their type is float, we don’t want to normalize them, and start at the first of the array. I will explain these stride and offset in a later tutorial. This completes the loading part.
Drawing the Triangle
Till now, we spent a lot of time understanding shaders, and other stuff in theory, now it’s time to put that into practice. To do so, we quickly get into the render method. What we do here is very very simple though, just have a look at it.
public void render(float delta)
{
    // Clear the screen
    glClear(GL_COLOR_BUFFER_BIT);

    // Use our program
    shaderProgram.bind();

    // Bind the vertex array and enable our location
    glBindVertexArray(vaoID);
    glEnableVertexAttribArray(0);

    // Draw a triangle of 3 vertices
    glDrawArrays(GL_TRIANGLES, 0, 3);

    // Disable our location
    glDisableVertexAttribArray(0);
    glBindVertexArray(0);

    // Un-bind our program
    ShaderProgram.unbind();
}
We are first clearing the color buffer of the screen, then we use our program. We then bind the vertex array we have created and enable the location zero. Then we call glDrawArrays function to say OpenGL to draw in the primitive mode of triangles using vertices 0 to 2, i.e., we are asking it to draw one triangle. Then we again disable the locations and bind a null vertex array and unbind the program.
Before you go execute this code, you have to handle one more thing, you need to dispose the resources we used. So add this into the dispose method.
public void dispose()
{
    // Dispose the program
    shaderProgram.dispose();

    // Dispose the vertex array
    glBindVertexArray(0);
    glDeleteVertexArrays(vaoID);

    // Dispose the buffer object
    glBindBuffer(GL_ARRAY_BUFFER, 0);
    glDeleteBuffers(vboID);
}
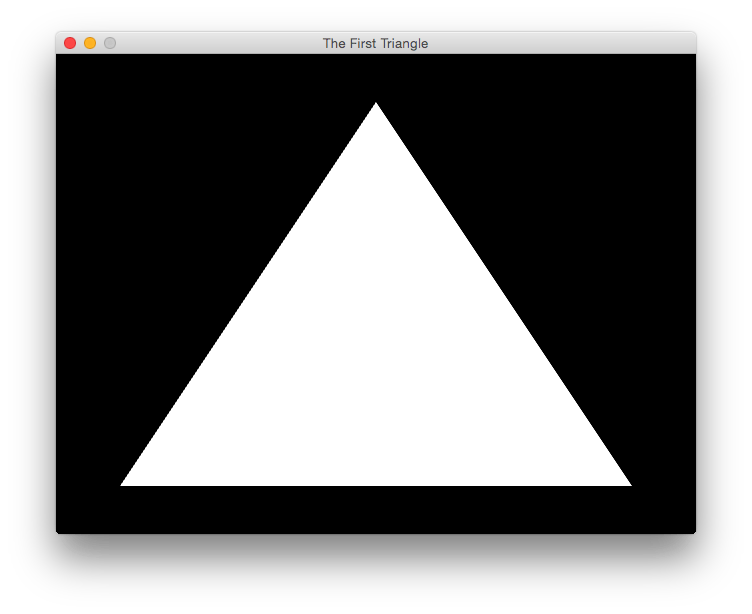
In the dispose method, we dispose the shader program, we dispose the vertex array and our buffer object. And now, you are ready to run this, and you can see a cute white triangle on the screen.
Conclusion
This is the end of the fifth part of this LWJGL Tutorial Series. In this part, we have put what we have learnt in the previous tutorials into practice and we rendered a cute little white triangle. In the next part of the series, let’s learn how to color this boring white triangle, see you soon guys!!
Source Code
All the source code for this tutorial is found on my GitHub repository here. Alternatively, you can see the source of the single files here.