
This series refer to an older version of LWJGL 3. The updates are in progress.
Contents
Hello everyone and welcome back to my LWJGL Tutorial Series. Last time, we learnt about how indexed rendering works in OpenGL by the use of Element Buffer Objects. In this tutorial, we are going to interleave the vertex position and color data into a single Vertex Buffer Object, and render a triangle on to the screen. Yes, you read it right, a triangle. Remember that this is the basic section, and triangle is a basic shape. We will get into complex shapes in the next section.
A short Recap
Till now, in the previous tutorials, we are using two separate VBOs to store the position and color of the vertices of our triangle. This is the piece of code that we have used in Tutorial2 of the series. Let’s have a small recap of what we have done.
// The vertex positions
float[] vertices = new float[]
{
    +0.0f, +0.8f,
    -0.8f, -0.8f,
    +0.8f, -0.8f
};

// The vertex colors
float[] colors = new float[]
{
    1, 0, 0, 1,
    0, 1, 0, 1,
    0, 0, 1, 1
};
The downside of this is, we are required to create two separate VBOs to store this data. Fortunately, OpenGL allows us to specify all this data in a single VBO and this practice is called as Interleaving and such VBOs are called as Interleaved Buffer Objects.
Vertices and the attributes
Till now, I was referring the positions as the vertices and colors separately. Now, we have to get a clear idea of what a vertex is, and what it’s components are. Assume that a vertex is a data element, and it has some attributes. The common attributes of a vertex are the following.
- Position
- Color
- Texture-coordinates
- Normal
In this tutorial, we will be learning about position and color attributes. I will leave out the rest to the future. So for this tutorial, think of a vertex as an element that has a position, and a color. The first term you need to understand is called as a Tuple. I don’t want to go into further details, but simply, a tuple is a data structure which contains an ordered list of elements. We can think of a vertex as a tuple.

So you now get it, a vertex has a position and a color. To be able to understand how we are going to combine the two components together, we need to understand how the pointers should be specified. Previously, we had two VBOs and we pointed them individually to the different locations. Here is an image of how we are doing it previously. I’m referring the positions as p variables and the colors as the c variables. The green boxes represent that they are stored in different VBOs.
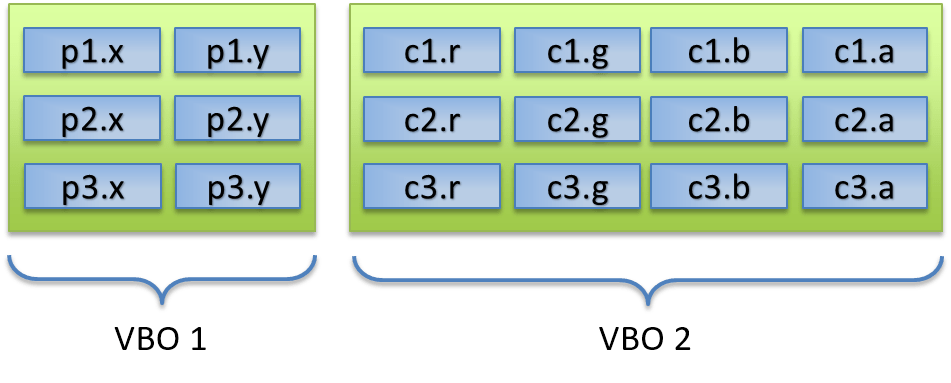
As you can see, two VBOs for two components. Now, we are going to use one VBO for two components. One shot, two birds. All we do is now pretty simple, we are just combining the two VBOs, but we are also keeping the order of the tuples. The order is like this, vertex, vertex, vertex, … which when written as a collection of components look like { position, color }, { position, color }, …. I think now you get the idea. This is shown in the next image to give you a clear picture.
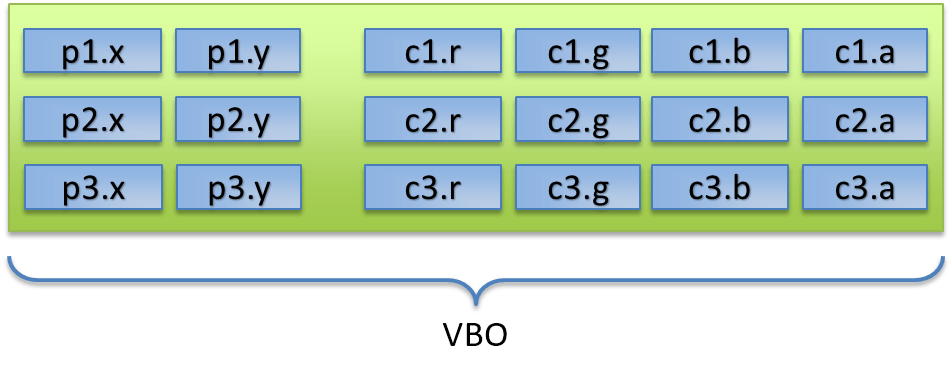
As you can see, there is really no much difference, but there is some difference. First, we are getting work done with only one VBO, second, we are grouping the position and color components, even when specifying the vertices. So instead of two separate float arrays as we have done previously, we will only be using one large float array. The float array that specifies the vertices will now look like this.
float[] vertices = new float[]
{
    // x,    y,     r, g, b, a
    +0.0f, +0.8f,   1, 0, 0, 1,
    -0.8f, -0.8f,   0, 1, 0, 1,
    +0.8f, -0.8f,   0, 0, 1, 1
};
Now it looks simple and also short. It is also easily readable. Now comes the real issue, telling OpenGL on how to use this data, we have to tell it what is a position component and what is a color component. And to do that, you have to understand two new terms, stride, and offset.
Understanding ‘stride’ and ‘offset’
From now on, we have to think in terms of bytes and not element indices in the array. In Java (and also in C/C++), a float is 4 bytes in size. That is the common value, but it may differ between different machines. I will tell you how to find out the correct size later, but for illustration, assume that it is 4 bytes. We will see the memory in a small table.
| +0 | +4 | + 8 | +16 | +20 | +24 | |
|---|---|---|---|---|---|---|
| 0: | p1.x |
p1.y |
c1.r |
c1.g |
c1.b |
c1.a |
| 28: | p2.x |
p2.y |
c2.r |
c2.g |
c2.b |
c2.a |
| 52: | p3.x |
p3.y |
c3.r |
c3.g |
c3.b |
c3.a |
Now let’s define what a stride is, and what an offset is. Stride, in simple words, is the size of the whole vertex in bytes. So here, we have two floats for the position and four floats for the color, totaling to 6 floats in a vertex. So the stride is \( 6 \times \mbox{floatSize} = 6 \times 4 = 24\; \mbox{bytes} \).
The offset in the other hand, is the number of bytes to skip from the start of the vertex to the start of the first float in that component. So in our example of the triangle, the offset to position will be \( 0 \) since it starts at location \( 0 \) (Programmers count by zero) and coming to the offset of the color, since it starts at index \( 2 \), it will be \( 2 \times \mbox{floatSize} = 2 \times 4 = 8\; \mbox{bytes} \). I think you now understand what stride and offsets are, so now it’s time to jump into the code.
// The size of float, in bytes (will be 4)
final int sizeOfFloat = Float.SIZE / Byte.SIZE;

// The sizes of the vertex and color components
final int vertexSize = 2 * sizeOfFloat;
final int colorSize  = 4 * sizeOfFloat;

// The 'stride' is the sum of the sizes of individual components
final int stride = vertexSize + colorSize;

// The 'offset is the number of bytes from the start of the tuple
final long offsetPosition = 0;
final long offsetColor    = 2 * sizeOfFloat;

// Setup pointers using 'stride' and 'offset' we calculated above
glVertexAttribPointer(0, 2, GL_FLOAT, false, stride, offsetPosition);
glVertexAttribPointer(1, 4, GL_FLOAT, false, stride, offsetColor);
Previously, since we did not interleave our buffers, we passed \( 0 \) to both stride and offset parameters of glVertexAttribPointer function so OpenGL assumed that the floats are tightly packed. Now that we have interleaving, we specified the calculated values instead of zeroes. Now if you run it, you will see the same old boring colored triangle on the screen.

So this is the end of this tutorial, and also the Basic OpenGL section of this series. From next onwards, we are moving on into the Intermediate OpenGL section and we are going to start with transformations like translation, rotation and scaling of the shapes. We will also see the 3D geometry in that section. Hope to see you there!
Source Code
As usual, all the source code for this tutorial is present in the project repository hosted on GitHub.